from fastai.vision.all import *Intro
In the first lesson of the course Walk with fastai, the missing pieces for success, Zachary Mueller explained to us the three levels he sees in fastai APIs. This is different to Jeremy Howard’s consideration, who sees two levels.
By the second lesson we had made use of those levels with different datasets.
In this post we are going to explore the three levels with MNIST dataset, and in the process we will also go step by step in some fastai pieces that were not obvious for me in my beginnings.
As an extra we are going to create the Datasets and Dataloader in raw PyTorch.
Importing fastai library and data
ImageDataLoaders??path = untar_data(URLs.MNIST); path, path.ls()(Path('/home/fmussari/.fastai/data/mnist_png'),
(#2) [Path('/home/fmussari/.fastai/data/mnist_png/training'),Path('/home/fmussari/.fastai/data/mnist_png/testing')])(path/'training').ls()(#10) [Path('/home/fmussari/.fastai/data/mnist_png/training/4'),Path('/home/fmussari/.fastai/data/mnist_png/training/7'),Path('/home/fmussari/.fastai/data/mnist_png/training/9'),Path('/home/fmussari/.fastai/data/mnist_png/training/5'),Path('/home/fmussari/.fastai/data/mnist_png/training/8'),Path('/home/fmussari/.fastai/data/mnist_png/training/0'),Path('/home/fmussari/.fastai/data/mnist_png/training/2'),Path('/home/fmussari/.fastai/data/mnist_png/training/1'),Path('/home/fmussari/.fastai/data/mnist_png/training/6'),Path('/home/fmussari/.fastai/data/mnist_png/training/3')]We can see that the data is stored in training and testing folders.
Each image is then stored in folders that represent its labels: 0, 1, 2, … 9.
File names and transforms
fnames = get_image_files(path)
fnames
(#70000) [Path('/home/fmussari/.fastai/data/mnist_png/training/4/47823.png'),Path('/home/fmussari/.fastai/data/mnist_png/training/4/45709.png'),Path('/home/fmussari/.fastai/data/mnist_png/training/4/49105.png'),Path('/home/fmussari/.fastai/data/mnist_png/training/4/746.png'),Path('/home/fmussari/.fastai/data/mnist_png/training/4/13451.png'),Path('/home/fmussari/.fastai/data/mnist_png/training/4/54187.png'),Path('/home/fmussari/.fastai/data/mnist_png/training/4/30554.png'),Path('/home/fmussari/.fastai/data/mnist_png/training/4/30886.png'),Path('/home/fmussari/.fastai/data/mnist_png/training/4/52580.png'),Path('/home/fmussari/.fastai/data/mnist_png/training/4/38515.png')...]Item and Batch transforms
item_tfms = [CropPad(34), RandomCrop(size=28), ToTensor()]
batch_tfms = [IntToFloatTensor(), Normalize()]
Transforms in action
Here we are going to explore what each transform does.
im = PILImageBW.create(fnames[0])
im
CropPad(50)(im)
RandomCrop(size=28)(CropPad(50)(im))
Have you ever tried reduce? Let’s the first two transforms sequentially with it:
from functools import reduce
reduce(lambda t,f: f(t), item_tfms[:2], im)
Which is equivalent to apply the transforms with a for loop:
im0 = im
for tfm in item_tfms[:2]:
    im0 = tfm(im0)
im0
What about applying the three transforms, also including ToTensor()
reduce(lambda t,f: f(t), item_tfms, im).shapetorch.Size([1, 28, 28])ToTensor()(RandomCrop(size=28)(CropPad(34)(im))).shapetorch.Size([1, 28, 28])High Level API
For this level we are going to use ImageDataLoaders, let’s explore some of its methods:
print([f for f in dir(ImageDataLoaders) if f[:4]=='from'])['from_csv', 'from_dblock', 'from_df', 'from_dsets', 'from_folder', 'from_lists', 'from_name_func', 'from_name_re', 'from_path_func', 'from_path_re']For this dataset from_folder method is the way to go.
help(ImageDataLoaders.from_folder)Help on method from_folder in module fastai.vision.data:
from_folder(path, train='train', valid='valid', valid_pct=None, seed=None, vocab=None, item_tfms=None, batch_tfms=None, img_cls=<class 'fastai.vision.core.PILImage'>, *, bs: 'int' = 64, val_bs: 'int' = None, shuffle: 'bool' = True, device=None) method of builtins.type instance
Create from imagenet style dataset in `path` with `train` and `valid` subfolders (or provide `valid_pct`)
Data Loaders
dls = ImageDataLoaders.from_folder(
    path, train='training', valid='testing',
    item_tfms=item_tfms,
    batch_tfms=batch_tfms
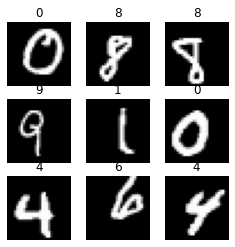
)type(dls)fastai.data.core.DataLoadersdls.show_batch(figsize=(4,4))
dls.bs #default batch size64print(dls.vocab.o2i){'0': 0, '1': 1, '2': 2, '3': 3, '4': 4, '5': 5, '6': 6, '7': 7, '8': 8, '9': 9}dls.train_ds, dls.valid_ds((#60000) [(PILImage mode=RGB size=28x28, TensorCategory(4)),(PILImage mode=RGB size=28x28, TensorCategory(4)),(PILImage mode=RGB size=28x28, TensorCategory(4)),(PILImage mode=RGB size=28x28, TensorCategory(4)),(PILImage mode=RGB size=28x28, TensorCategory(4)),(PILImage mode=RGB size=28x28, TensorCategory(4)),(PILImage mode=RGB size=28x28, TensorCategory(4)),(PILImage mode=RGB size=28x28, TensorCategory(4)),(PILImage mode=RGB size=28x28, TensorCategory(4)),(PILImage mode=RGB size=28x28, TensorCategory(4))...],
(#10000) [(PILImage mode=RGB size=28x28, TensorCategory(4)),(PILImage mode=RGB size=28x28, TensorCategory(4)),(PILImage mode=RGB size=28x28, TensorCategory(4)),(PILImage mode=RGB size=28x28, TensorCategory(4)),(PILImage mode=RGB size=28x28, TensorCategory(4)),(PILImage mode=RGB size=28x28, TensorCategory(4)),(PILImage mode=RGB size=28x28, TensorCategory(4)),(PILImage mode=RGB size=28x28, TensorCategory(4)),(PILImage mode=RGB size=28x28, TensorCategory(4)),(PILImage mode=RGB size=28x28, TensorCategory(4))...])Mid Level API
With the mid level API we define blocks according to the problem. In this case we have image inputs and categories to predict.
blocks
blocks = (ImageBlock(cls=PILImageBW), CategoryBlock)GrandparentSplitter and parent_label
It was transparent to us in the high level API, but what from_folder method used to split the dataset into train and valid was GrandparentSplitter. Lets see how it works:
splitter = GrandparentSplitter(train_name='training', valid_name='testing')Let’s create a tiny subset of fnames, having training and testing samples, and see how splitter works:
sub_fnames = fnames[:2] + fnames[-2:]
sub_fnames
(#4) [Path('/home/fmussari/.fastai/data/mnist_png/training/4/47823.png'),Path('/home/fmussari/.fastai/data/mnist_png/training/4/45709.png'),Path('/home/fmussari/.fastai/data/mnist_png/testing/3/7829.png'),Path('/home/fmussari/.fastai/data/mnist_png/testing/3/2300.png')]splitter(sub_fnames)([0, 1], [2, 3])We can see it is returnin a tuple with two list of indices, one for training, and one for validations, according to the folder the images are located in.
t, v = splitter(fnames)
len(t), len(v)
(60000, 10000)The high level API also used the parent_label function under the hood. It returns the label from the parent folder of each image.
parent_label(sub_fnames[0]), parent_label(sub_fnames[2])('4', '3')PILImageBW.create(sub_fnames[2])
DataBlock
dblock = DataBlock(
    blocks=blocks,
    get_items=get_image_files,
    splitter=splitter,
    get_y=parent_label,
    item_tfms=item_tfms,
    batch_tfms=batch_tfms
)type(dblock)fastai.data.block.DataBlockData Loaders
dls = dblock.dataloaders(path, bs=64)dls.show_batch(figsize=(4,4))
dls.bs64print(dls.vocab.o2i){'0': 0, '1': 1, '2': 2, '3': 3, '4': 4, '5': 5, '6': 6, '7': 7, '8': 8, '9': 9}dls.train_ds, dls.valid_ds((#60000) [(PILImageBW mode=L size=28x28, TensorCategory(4)),(PILImageBW mode=L size=28x28, TensorCategory(4)),(PILImageBW mode=L size=28x28, TensorCategory(4)),(PILImageBW mode=L size=28x28, TensorCategory(4)),(PILImageBW mode=L size=28x28, TensorCategory(4)),(PILImageBW mode=L size=28x28, TensorCategory(4)),(PILImageBW mode=L size=28x28, TensorCategory(4)),(PILImageBW mode=L size=28x28, TensorCategory(4)),(PILImageBW mode=L size=28x28, TensorCategory(4)),(PILImageBW mode=L size=28x28, TensorCategory(4))...],
(#10000) [(PILImageBW mode=L size=28x28, TensorCategory(4)),(PILImageBW mode=L size=28x28, TensorCategory(4)),(PILImageBW mode=L size=28x28, TensorCategory(4)),(PILImageBW mode=L size=28x28, TensorCategory(4)),(PILImageBW mode=L size=28x28, TensorCategory(4)),(PILImageBW mode=L size=28x28, TensorCategory(4)),(PILImageBW mode=L size=28x28, TensorCategory(4)),(PILImageBW mode=L size=28x28, TensorCategory(4)),(PILImageBW mode=L size=28x28, TensorCategory(4)),(PILImageBW mode=L size=28x28, TensorCategory(4))...])Low Level API
We already created a splitter, lets now split the data.
splits=splitter(fnames)
len(splits[0]), len(splits[1])
(60000, 10000)Datasets
dsrc = Datasets(
    items=fnames,
    tfms=[[PILImageBW.create], [parent_label, Categorize]],
    splits=splits
)type(dsrc)fastai.data.core.Datasetsshow_at(dsrc.train, 3);
Exploring what each tfms does
PILImageBW.create(fnames[0])
l = parent_label(fnames[0])
l'4'Categorize(l)Categorize -- {'vocab': ['4'], 'sort': True, 'add_na': False}:
encodes: (Tabular,object) -> encodes
(object,object) -> encodes
decodes: (Tabular,object) -> decodes
(object,object) -> decodesData Loaders
dls = dsrc.dataloaders(
    bs=128,
    after_item=item_tfms,
    after_batch=batch_tfms
)dls.show_batch(figsize=(4,4))
dls.bs128print(dls.vocab.o2i){'0': 0, '1': 1, '2': 2, '3': 3, '4': 4, '5': 5, '6': 6, '7': 7, '8': 8, '9': 9}dls.train_ds, dls.valid_ds((#60000) [(PILImageBW mode=L size=28x28, TensorCategory(4)),(PILImageBW mode=L size=28x28, TensorCategory(4)),(PILImageBW mode=L size=28x28, TensorCategory(4)),(PILImageBW mode=L size=28x28, TensorCategory(4)),(PILImageBW mode=L size=28x28, TensorCategory(4)),(PILImageBW mode=L size=28x28, TensorCategory(4)),(PILImageBW mode=L size=28x28, TensorCategory(4)),(PILImageBW mode=L size=28x28, TensorCategory(4)),(PILImageBW mode=L size=28x28, TensorCategory(4)),(PILImageBW mode=L size=28x28, TensorCategory(4))...],
(#10000) [(PILImageBW mode=L size=28x28, TensorCategory(4)),(PILImageBW mode=L size=28x28, TensorCategory(4)),(PILImageBW mode=L size=28x28, TensorCategory(4)),(PILImageBW mode=L size=28x28, TensorCategory(4)),(PILImageBW mode=L size=28x28, TensorCategory(4)),(PILImageBW mode=L size=28x28, TensorCategory(4)),(PILImageBW mode=L size=28x28, TensorCategory(4)),(PILImageBW mode=L size=28x28, TensorCategory(4)),(PILImageBW mode=L size=28x28, TensorCategory(4)),(PILImageBW mode=L size=28x28, TensorCategory(4))...])Raw PyTorch
Just as the previous fastai examples, this is based in the amazing Walk with fastai course whose Using Raw PyTorch lesson has the following note in the Dataset code. > This example is highly based on the work of Sylvain Gugger for the Accelerate notebook example which can be found here: https://github.com/huggingface/notebooks/blob/main/examples/accelerate_examples/simple_cv_example.ipynb
from torchvision.transforms import ToTensor, Normalize, Pad, RandomCrop

from torch.utils.data import Dataset
from torch.utils.data import DataLoader
from torch import nn
Train and validation Datasets
class MNISTDataset(Dataset):
    def __init__(self, path:Path, transforms:nn.Sequential=None):
        self.transforms = transforms
        self.paths = [f for folder in path.iterdir() for f in folder.iterdir()]
        self.to_tensor = ToTensor()

    def __len__(self):
        return len(self.paths)

    def apply_x_transforms(self, filepath):
        image = Image.open(filepath)#.convert("RGB")
        tensor_image = self.to_tensor(image)
        return self.transforms(tensor_image)

    def apply_y_transforms(self, filepath):
        label = filepath.parent.name
        return int(label)

    def __getitem__(self, index):
        filepath = self.paths[index]
        x = self.apply_x_transforms(filepath)
        y = self.apply_y_transforms(filepath)
        return (x, y)
train_transforms = nn.Sequential(
Pad(6),
RandomCrop(28)
)train_dataset = MNISTDataset(path/'training', train_transforms)
valid_dataset = MNISTDataset(path/'testing')
len(train_dataset), len(valid_dataset)(60000, 10000)One of the items in the dataset:
x,y = train_dataset[0]
x.shape, y
(torch.Size([1, 28, 28]), 4)PyTorch Dataloader
bs = 128train_dataloader = DataLoader(
train_dataset,
shuffle=True,
drop_last=False,
batch_size=bs
)valid_dataloader = DataLoader(
valid_dataset,
batch_size=bs*2
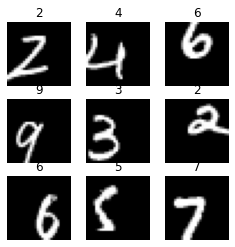
)next(iter(train_dataloader))[0].shape, next(iter(train_dataloader))[1].shape(torch.Size([128, 1, 28, 28]), torch.Size([128]))figure = plt.figure(figsize=(4, 4))
cols, rows = 3, 3
for i in range(1, cols * rows + 1):
sample_idx = torch.randint(len(train_dataset), size=(1,)).item()
img, label = train_dataset[sample_idx]
figure.add_subplot(rows, cols, i)
plt.title(label)
plt.axis("off")
plt.imshow(img.squeeze(), cmap="gray")
plt.show()
The next cell is just a curiosity leaned from twitter:
a = [1,2,3]
b = [4,5,6]
[i for i in (*a,*b)]
[1, 2, 3, 4, 5, 6]Conclusion
- We ended with the same fastai’s
DataLoadersin three different ways, and then in an extra raw PyTorch way. - As Zachary puts it, the higher the level of the API, the lesser the flexibility, but there is also less complexity.
- He also pointed out that the mid level API is made with the building blocks of the framework.